Friday, January 25, 2013

Life-Changing Lasagna Rollups and Other Glorious Things.

Okay, so the next official thing on my original list was Crockpot Spaghetti and Meatballs. It was a good recipe. Here's a tip, though. If you're thinking of making it a freeze-ahead meal, don't. It was stuck in this huge chunk that had to be meticulously broken up. And of course, I sliced a huge chunk out of my finger. I'm just so used to old, blunt knives. Our sharp new Farberware ones are really dangerous to a hack and slasher like me.

I feel like I probably looked like this when I was done breaking that thing up.
In any case, I'm not going to feature that spaghetti because it was just your run-of-the-mill spaghetti and meatballs. Today was another snow day--well, rather, it was an ice day. No way I was venturing out into that stuff. Especially since I was feeling pretty under the weather last night/early this morning. However, by the time I got out of bed at the glorious hour of 10am, I was ready for a productive day. When I get an unexpected day off, I love to use it for projects. I started off with a metabolism-boosting, energy-providing, antioxidant-giving, free-radical-fighting drink of my own invention. It's simple. Hot green tea, honey, lemon, and cinnamon. If you have any low blood sugar problems, however, I urge you to eat directly afterward or you will feel ultra-nauseous. It tastes really good, but I think because it gets your body going, you need fuel (preferably protein).

I opted to design a delectable smoothie:


  • 1 cup oats
  • 1 whole banana
  • 5 strawberries
  • 1 stalk celery
  • 3 T almond butter
  • 1 cup greek yogurt
  • 1/2 cup milk
  • 1 tsp honey
So good and so nutritious!


Afterward, I made and utilized the hair mask and tooth whitener I posted about last Friday, using fresh lemon juice this time (worked much better). Then, I showered, using the leftover Like Buttah Body Scrub. My skin was wonderfully soft and I made myself nice and pretty, just for funsies.

Next, I made an awesomely healthy dessert. I was worried it might taste weird, but I was wrong. These Zucchini Brownies are fantasmic! Not as chocolatey as regular brownies (I may add semi-sweet chocolate chips next time to make them perfect), but so excellent.

Ingredients:

  • 1/2 cup unsweetened applesauce
  • 2 small or medium bananas, mashed
  • 1 1/2 cup sugar
  • 2 tsp vanilla extract
  • 1/2 cup cocoa powder
  • 1 1/2 tsp baking soda
  • 1/2 tsp salt
  • 2 cups finely shredded zucchini (you'll probably need 2 large zucchini)
  • 2 cups all purpose flour (I used whole wheat flour! You can probably also use gluten free, but check out a proper conversion chart beforehand.)
  • 1/2 cup walnut pieces (I hate brownies with nuts, so I skipped these)
Directions: 

Preheat oven to 350 degrees F. Grease (or spray) and flour a 9x13" baking pan. In a large bowl, mix together the applesauce, mashed bananas, and sugar. Add vanilla and cocoa and mix together. Then add baking soda, salt, and zucchini and mix together. Add flour and walnuts [or sub chocolate chips] and mix together. Spread evenly into the pan. Bake for 25-30 minutes until the brownies spring back when gently touched. Makes 24 servings.

I topped them with a light dusting of powdered sugar, as well. Now, they will be VERY moist and fudgy. I promise they're completely cooked at the 25-30 minute mark. That's the texture you want because they're delectable. Even my picky Tom liked them.

Tastes like this...
With benefits like this!
After the brownies were made (and the dish washed for the second time that day, seeing as we only have one casserole dish), I unclogged the kitchen sink using 1 cup salt and 1/2 cup baking soda mixed together. You pour it in the drain directly followed by a kettle of boiling water. Way cheaper than Drano, folks! 

I did a lot today. At one point, while talking to my big sister, I told her everything I had accomplished on my "day off." She said, "See, you should definitely have kids. You'd be an awesome mom!" It's funny if you know me, because I've always spurned the idea of reproducing. haha. But perhaps my mind is changing on the matter.

Finally, I get to the good part: our delicious dinner. The picture below does not look like the one you'll find in the link. But I assure you, you should make them this way. They were good when I went light on the sauce and only had cheese inside the rolls, but I rebaked them on 300F with a ton of extra sauce and cheese on top and it made them way, way better. They're still healthy. I used whole wheat noodles, low fat ricatta, and skim mozzarella. I also added ground chicken (because we are carnivores in this house). It is super vital that you make your own marinara sauce for it, as it makes you feel like Rachel Ray (only less annoying), and it tastes way better than store-bought sauce. It's also WAY healthier and cheaper. Do it. Just do it.

Delectable and fancy.
Now, today's dinner and a movie pairing is another horror film (What can I say? Cold weather is optimum horror movie time!). This time, it's the American version of Ju-On: or, as you all know it...


Sidenote: It IS more terrifying than The Ring, which was the first true horror movie I ever saw. I saw it at my chorus teacher's house. There were nine of us girls sitting on a pull-out couch bed. At an intensely climactic part, the couch cracked loudly and collapsed, sending us all into shrieking mode. One of the funniest things ever. Directly after the movie, another girl and I went into the guest room...where, right across from the door, sat a rustic wooden chair. If you've seen The Ring, you know why that was the worst possible thing for us to see. haha.

Anywho, signing off. Remember, productivity feels much better than lazing around like a big lame fatty-pants. Unless you're having one of these days:

It's perfectly okay to feel this way once in a while.

Wednesday, January 23, 2013

Chicken Soup and Ju-On

Hello friends. The next recipe is Crockpot Chicken Vegetable Soup (for which I received many compliments). It can be a freeze-ahead meal! But before we get to that, I'm going to talk to you about investment portfolios. I'm new to the financial realm, but I'm really beginning to think about preparing for the future--and so should you. I'm not looking to form an upscale gambling problem on Wall Street, but I would like to have money to retire comfortably one day. I don't want to be working when I'm 75 (unless I magically fall into a job I love and am still nice and spry).

Or if I happen to be leading the Hell's Angels.
I already established a 401k. It's more stable and has less risks than an IRA, so that's what I went with. Yesterday, however, I started looking at investment strategies. I'm not looking for a quick million (though that would be nice). I don't like the idea of risking and losing everything. Thankfully, I came across a very helpful article about so-called "Lazy Portfolios." A lazy portfolio involves investing in anywhere from three to eleven low-cost, no-load index funds that will continue to succeed in a "bull and bear market (a term for the ups and downs of optimism and pessimism regarding the market and the resulting trends)." You don't trade at all. You don't hire a broker. You don't watch the funds like a hawk while biting your nails. Apparently, some of America's most wealthy people follow principles like "Buy quality and never sell" (Warren Buffett). 

I'm willing to listen to this guy. He is at the very least obviously very knowledgeable about milkshakes.
This method absolutely appeals to me. I'm going to begin my research. Of course, I've just now had my first paycheck where my immediate bills didn't completely outweigh the amount of pay received. I won't have a lot of money leftover, but I will have some (for the first time in months). My finances are finally starting to catch up. Once I get all of my debts paid off and buy a few things I need (car repairs, new athletic shoes), I plan on living solely on my hourly pay and putting all of my bonuses (commission) into savings. Once I've saved up a couple thousand dollars, I'm going to start my investing. I'm not going to put an excessive amount in, as I am planning to buy a car by the end of the year. Mine is a bit of a death trap.

At least it's safer than this useless thing.
So, back to lazy portfolios. They say you can easily be a millionaire by the time you retire if you invest intelligently and follow some simple rules. Check out the sample portfolios here. Don't forget to also read the handy dandy how-to. I know what I'll be doing later this year.


"Ingredients
  • 2 medium skinless boneless chicken breasts cut into 1 inch cubes
  • 4 -14 oz cans chicken broth
  • 1 pound frozen white corn
  • 1 medium onion diced
  • 4 cloves garlic minced
  • carrots pealed and diced
  • celery stalks chopped
  • 1 1/2 tsp chicken soup base or 2 bouillon cubes
  • 1 t oregano
  • 1/2 t thyme
  • 1/2 t pepper
  • salt to taste
Instructions
1) Chop 2 pealed carrots, 2 stalks celery and one medium onion.2) Trim and cut 2 medium skinless boneless chicken breast into 1 inch cubes.3) Add veggies, 4 cloves minced garlic, 4 - 14 oz cans chicken broth, 1 1/2 tsp of chicken soup base or 2 bouillon cubes, 1 t oregano, 1/ 2 tsp each of thyme and pepper. Salt to taste. 16 oz package of frozen white corn. Add chicken and mix well.4) Cook for 8 hrs on low.
Details
Prep time: Cook time: Total time: Yield: 8 serving"

I added about 1/2 cup barbecue sauce because it tasted a little bland when I got home from work (I had let it cook on LOW all day). This addition gave the soup a nice smoky, rounded-out taste. I didn't do so, but I suggest using more chicken. It may not be as "healthy," to have more meat, but it adds more substance and I highly recommend it. The taste of the soup is excellent, however. The fellas were positively raving about it. I paired it with leftover Cheddar Bay Biscuits from our date night at Red Lobster.

Now, DON'T buy cans of chicken broth. It's way more cost effective to get the cartons (I think they're 30 oz. each). And it helps with the freeze-ahead...

**MY freeze-ahead method: Only use one of the chicken broth cartons in the freezer mixture. It'll all fit in a gallon Ziploc bag. Freeze it all. When you go to unfreeze, pour the bag in the crockpot. It should come out fairly easily, but I cut the side of the bag to get it out more quickly. Then, pour the remaining carton of chicken broth over the mixture. It'll aid in the defrost.

The night we had this soup, the conditions were perfect. It was freezing cold and we were practically snowed in. I sat down with the fellas, a snuggly blanket, and a bowl of this soul-warming soup. What better to combine with coziness and comfort food than pure terror? We turned off all the lights and watched a Japanese horror movie (which, for the record, can be MUCH scarier than American ones and in my experience have zero scenes of pointless, gratuitous nudity). Say bye-bye to bleach blonde, silicone-infested idiots. Say hello to fear.

The Grudge...the original. The terrifying. The culturally educational.

I do believe I've begun a new tradition. Every meal recipe will be paired with a movie suggestion to match. YES.


Monday, January 21, 2013

Back on Track

I'm just not going to keep a real-time blog with the recipes. haha. Don't forget, if you're following the original plan (or trying), all of the recipes in it are listed at my Pinterest food board. That said, I will be including my favorite recipe so far: Chicken Parmesan Meatloaf! I have had a surplus of leftovers, even while bringing my lunch to work. So I actually was able to skip a cooking day Saturday, which was nice. Given, we did make additional food (grilled cheese sandwiches to go with a soup on the meal plan), but I thought we'd eat away at the leftovers before making more meals.

I will say that using my entire food budget for the groceries on this meal plan has definitely helped me feel and look better. When you've got real food on hand, you're a lot less likely to overeat or run out for fast food "snacks" five times a day. I'm still in the phase of my new job where your income hasn't caught up with your bills (most companies delay your first check), so I literally have no money left for unnecessary food. I've lost some weight and had more energy. Plus, I feel like an actual adult and get to brag about my chef skills--another win. On the not-so-bright side, I have carved a couple of chunks out of my fingers. haha. See, I'm used to cooking with old, cheap knives. Lately I've been using new, very sharp ones--and I'm accident-prone. My hands look a little rough.

It's only slightly less terrible than this.
Since I didn't have to make dinner on Saturday, I made [what were supposed to be] oatmeal cookies. Now, I'm a great cook. Admittedly, however, I am quite the mediocre baker. You can't toss in random ingredients without disturbing the delicate chemistry, but I always feel like a robot when I don't throw in something of my own. Sometimes, it works out wonderfully. Others, it turns into something completely different than what I set out to do. In this case, the "cookies" turned into more of a teacake/muffin top sort of consistency; they were way more bread-like than dense. I did substitute applesauce for one of the eggs. And yeah, I didn't measure that amount of applesauce. They're still delicious, but next time I think I will just go get eggs instead of trying to improvise with what I have. haha. You can find the recipe I used here. I also added blueberry-flavored Craisins. I think that adds to the muffin top feel flavor-wise, but I assure you they will not ruin the chemistry. If I could have foretold the texture, I would've turned it into a cake and made a cinnamon cream cheese icing! However, I am not clairvoyant. Alas.

Before I get to the CPM recipe (mmm), I'm going to do my spiel on green tea. I've been trying to drink between 1-3 cups of it a day (and lately have been slicing lemon to put in it to increase the diuretic/nutritional effect). But why? Well, did you know it fights bad breath? Or that, if you don't enjoy the flavor, its neutral flavor blends well with other flavors of tea (including herbal, black, white, and red teas)? Here are some other reasons to drink it:


I only started drinking it for the fat-burning bit--then I found out all of these other great things. For those of you who don't care about your health, but care about being skinny (which, I'm sorry, is really stupid), I lost weight before I started my meal plan because I was drinking a ton of green tea. I was eating terribly, not exercising, and still managed to shed a few pounds. I attribute it to green tea. I try to tell everyone about it, but they really don't listen. Don't do some stupid diet. Eat healthy foods, reduce processed junk, and drink green tea (in addition to plenty of water).

Okay, Chicken Parmesan Meatloaf (it'll change your life):


Chicken Parmesan Meatloaf
original Joelen recipe

1 lb ground chicken (ground turkey can be substituted)

1 egg

1/4 cup breadcrumbs

1/2 teaspoon dried basil

1/2 teaspoon dried thyme

1/2 teaspoon dried oregano

1-2 cloves garlic, finely minced

1 small onion, grated

1/2 teaspoon salt

1/4 teaspoon ground black pepper

1/2 cup grated Parmesan cheese

1/2 cup pasta sauce (homemade or store bought)

1/2 cup shredded Italian cheese blend

minced parsley for garnish


Preheat the oven to 350 degrees. Lightly grease a loaf pan with cooking spray, set aside.

In a large bowl, combine the ground chicken, egg, breadcrumbs, thyme, oregano, basil, garlic, onion, salt, pepper and Parmesan cheese. To not over handle the mixture otherwise it will get tough. Place the mixture in the greased loaf pan and form into a loaf. Top the meatloaf with pasta sauce.

Place filled loaf pan on a baking sheet and bake in the preheated oven for 40-45 minutes. Remove the meatloaf from the oven and sprinkle the top with the remaining shredded cheese. Place the meatloaf back in the oven and bake until the cheese is melted.

Remove the meatloaf from the oven and allow to rest for 5-10 minutes before serving/slicing. Garnish with parsley if desired.

* To make ahead/freezer meal - Prepare the meatloaf mixture as directed and place in a disposable loaf pan. Cover and freeze.** When ready to prepare and serve, defrost the meatloaf completely and preheat oven to 350 degrees. Top with pasta sauce and place filled loaf pan on a baking sheet.  Bake in the preheated oven for 40-45 minutes. Remove the meatloaf from the oven and sprinkle the top with the remaining shredded cheese. Place the meatloaf back in the oven and bake until the cheese is melted. Remove the meatloaf from the oven and allow to rest for 5-10 minutes before serving/slicing. Garnish with parsley if desired. 

** Alternately, you can top the meatloaf with pasta sauce before freezing and then bake from frozen, uncovered for 55-60 minutes on a baking sheet. Remove the meatloaf from the oven and sprinkle the top with the remaining shredded cheese. Place the meatloaf back in the oven and bake until the cheese is melted. Remove the meatloaf from the oven and allow to rest for 5-10 minutes before serving/slicing. Garnish with parsley if desired.


So freakin' good.
I did the second freeze-ahead option and it was so easy. I served it with asparagus pan-cooked in olive oil with salt, pepper, a dash of garlic, and grated parmesan cheese. I also used skim mozzarella, so this meal was nice and healthy. Plus, think: easy-peasy Chicken Parm sandwiches with the leftovers! A couple of days later, I made a nice weekend lunch by heating up the leftovers and serving them with boxed white cheddar mac and cheese (to which I added mozzarella and parmesan)--fattening, but delish (and hey, it was the weekend).

Last, but not least, I heard a country song talking about Jagermeister (the official drink of d-bags everywhere). Phil from Modern Family would probably be the level of upset I was when I heard it.


Friday, January 18, 2013

Snow Day, Spa Day! (DIY)

Last night, as most of you know, it was snow time in Tennessee. Getting home from work was an ordeal. Luckily, I am the queen of alternate routes and managed to skate through with much less time than it took a lot of my friends to commute. Win! Next win came when I woke up knowing that no one expected me to come into work today. I called and spoke with my manager, who was also stuck at home, and secured my four-day-weekend. I suppose I could have used today to just lay around, but instead I was bitten by the productivity bug (as per usual). I did allow myself to sleep in obnoxiously late, but then I got up and got busy! I decided to peruse Pinterest/search engines for DIY spa treatments that involved ingredients I already had at home. I ended up making/executing five of them and thought I might supply/review them for you!

I have never been to a spa, had a facial, had a pedicure, had a massage--but I felt pretty relaxed and pampered just doing these things at home, so why worry about things I may never afford? I'd like to offer you the same simple luxuries.

All you need for this is a large hole in your garden!
Don't actually dig a hole in your garden. haha. I did not experience the magic of mud today, but I did experience the magic of olive oil. All but two of the treatments I made today involved it in some capacity! I started with a hair mask, because it's got to stay in there for a little minute...

Restoring Hair Mask


  • 2 Tablespoons Honey
  • 1 Tablespoon Olive Oil
  • 1 Tablespoon Apple Cider Vinegar 

What it is for: Damaged/dry hair. My hair is very coarse and tends to get split ends easily. I also had my hair dyed twice in the last three months because I'm trying to get back to blonde (If you're a natural blonde, I really don't recommend going dark...ever. haha). Bleach and hair stripper take their toll and my hair was feeling rough and looking frizzy.

Instructions: You can warm the honey in the microwave for a bit to help it blend better, but I didn't do that and it worked just fine. I just went ahead and mixed the mask in a pourable measuring cup to make it easier to put on my head! Anywho, stir up the ingredients, apply all of it all over your head, pin/pull your hair up, and leave it in for 30 minutes. I ended up having it in there for more like 45 because I was busy making/using the other treatments, but it didn't cause any problems to leave it in longer. Just jump in the shower and shampoo and condition normally when the time is up. But don't do that before you make the body scrub I'll also be including in this post!

Results: I will definitely use this recipe again. Not only does my hair feel much softer today, my natural curl really came out as it air-dried (instead of the blobby, uneven waves my hair likes to sport when damaged). If your hair is really rough/dry like mine, the key is to condition thoroughly after washing out the mask.
Works like a charm.

 I also applied Redken's Extreme Anti-Snap (a preferred product of mine, but not vital to achieving results with the mask) before brushing out my hair.

After applying the hair mask, I moved on to...

Dr. Oz's Teeth Whitening Treatment


  • 1/4 Cup Baking Soda
  • Juice from Half of a Lemon (about 1.5 Tablespoons)
What it is for: Whitening your teeth, duh! But seriously, it's like a WAY cheaper version of store-bought whiteners like strips and trays.

Instructions: Mix them up. Don't be freaked out when it initially gets a little fizzy. Using a cottonball, apply the mixture liberally to the teeth. Leave on for about a minute. Rinse, then brush teeth.

Results: My teeth were noticeably whiter right after I did it. I'll definitely do this once a week or so (if I can avoid my shameful laziness in the realm of self-care and beauty). It tasted a bit yucky, I'll admit. And Tom was a bit grossed out by me having the appearance of foaming at the mouth, so maybe lock the bathroom door when you do it. haha. Next time, I believe I will also try applying the mixture with Q-tips instead. It seems more practical. I also used lemon juice from concentrate, so I don't think it's a big deal if you don't have fresh lemons just randomly sitting at your house. Last but not least, you really don't need as much as the recipe makes for just yourself. Maybe for a shark's mouth, but not for yours. I'm going to try and cut it down to about a third of what I made today so as not to waste!


Thanks, Dr. Oz!
Next, I tried the so-called "at home facial"...

Exfoliating Facial

  • 1 Packet Plain Oatmeal (people say that's about 1/2 Cup, uncooked)
  • 1 Teaspoon Honey
  • 1 Teaspoon Olive Oil
What it is for: Um, exfoliation? The oatmeal acts as an exfoliator, the olive oil as a moisturizer, and the honey has dual roles in cleansing and moisturizing. Yeah, did you know honey is antibacterial?

Instructions: Cook the oatmeal with minimal water. You don't want to eat a big bowl of it, you just want to form it to a paste-like consistency. Add in the honey and olive oil, mix well. Use as a scrub, then rinse.

Results: My face did feel nice after doing this, but the mixture was awkward and goopy. Maybe if you used less oatmeal, it would be better? Once again, there were leftovers. I don't know if they keep or not, because I didn't have a container for them and ended up throwing them out. I probably won't use this mask again. Too sticky and messy.

I felt like this kid.
Finally, I was ready to make the thing I was most excited about...

"Like Buttah" Body Scrub

  • 1 Cup Raw Oats
  • 1 Cup Brown Sugar
  • 1 Cup Olive Oil
What it is for: Softening the skin through an artful combination of exfoliation and moisturizing.

Instructions: Mix the three ingredients well (preferably in a Mason jar or other reusable/storage container, because you'll probably have leftovers). Wash your body in the shower, then use this all over! Get a good scrub going, especially on your legs. If you want the extra perk of smoother legs, shave before applying the scrub.

Results: I love this scrub more than Linda Richman loves Barbara. And that's a lot. It made my skin feel so insanely soft. Earlier, Tom gave me a hug and was like woah! Now, I will caution you that you shouldn't do this if you're in some kind of hurry. You'll need to clean the oatmeal out of the bottom of the tub. But that's a fairly quick and easy task and the payoff is so absolutely worth it. It's like buttah! If you don't get that reference, first, rethink your life. Then, watch this: 


Talk amongst yourselves.
I got out of the shower, dried off, brushed my hair, slathered on some cocoa butter lotion, and decided it was time to relax. Ooh, here's a tip for IN the shower, though. Light yourself a few scented candles and play some classical music or jazz! It totally ups the game and makes you feel fancy.

Before I get to my last treatment, you may ask: Why put on lotion if the body scrub already made your skin so soft? Well, I was watching a comedian not too long ago. He was white and was talking about a date he had with a black girl. She was, according to him, 'constantly putting on lotion.' When he asked her why, she stated that it was to avoid looking ashy. She then preceded to show him, by scraping her nails down his chalky arm, that white people are ashy, too. He said he had an epiphany about why black people age so much more gracefully. They're actually hydrating their skin all the time while we're burning ours up and letting it wither. haha. So, every day, I've been putting lotion all over. I've got to keep my skin youthful if I want to be a cougar someday!

Oh yeah, just like that.
Okay, the last thing is super easy and super relaxing.

Eye Rejuvenator

  • 2 Green Tea Bags
  • Water
  • Mug/Teacup
What it is for: Calming eye puffiness/under-eye circles.

Instructions: Heat the water, obviously. Steep the two teabags. Once your tea has steeped, take the teabags out (letting them drip off a bit to avoid excess liquid going everywhere) and place them on your  [closed] eyes. Lay back and relax until they lose warmth.

Results: My eyes felt rested and bright! I also felt energized, because I of course drank the green tea. Add citrus juice to it for extra protection from free-radicals (to the tea, not your eyes--ouch). An excellent end to today's DIY spa treatments.

So there you go--spend an hour or so giving yourself a "spa day" and reap all the rewards a little relaxation and a lot of self-care will afford you.


Thursday, January 17, 2013

Relaxin'...

All cool, shootin' some b-ball outside of the school...well, that's a lie. I didn't do that. And no two guys that were up to no good started makin' trouble in my neighborhood. All was [almost] calm on the Western front. But I did take a couple of nights off from worrying about my sister's wedding or blogging or anything. I was starting to stress myself out with constant strategizing. I'd make a crap general. haha. So I should have posted the next recipe last night, but instead went out to a lovely dinner with my fella, took a long shower, and went to bed early (well, early for me anyway).

I do plan on getting more organized with this blog. One of the next items on my list titled "Things to Buy When I'm Not Broke" is a cord that allows me to load the pictures from my camera onto my computer. I got the camera secondhand, so I haven't even been able to use the pictures I've taken! One day there will be an end to these endless stock photos. I probably won't stop using funny memes, however...because they're funny. I didn't even know what the word "meme" meant until like a year ago. I'm not as much of an internet nerd as I seem to be. Lately I have spent an inordinate amount of time surfing because of my new job. We've had a ton of downtime in training...and what better way to fill in than with discovering the magic of the web?

One of the handy-dandy things I've found is how to make different produce last longer. I utilized a lot of the tips listed and they really seem to be working. Here's a little sampling:

1) Store asparagus like flowers (in vase with water, covered in plastic)
2) Use a solution made of 1 part vinegar (apple cider vinegar is preferable) and 10 parts water to soak berries. The berries will keep from getting soft, mushy, and moldy for a couple of extra weeks!
3) Store celery in the fridge crisper wrapped in aluminum foil.
4) Store apples with potatoes to keep the potatoes from budding.
5) Don't store apples and bananas together. The ethylene gas a fruit emits when it is ripening can actually make surrounding fruit go bad faster. Bananas and apples both emit high levels as compared to other fruits.

There are many more awesome ways to keep your groceries good longer at this website. It's easy to just do these things when you put your groceries away. It isn't majorly time-consuming and takes minimal effort. Give it a shot!

Now, the next recipe on the list is Pot Roast and Veggies (cooked in a crockpot, of course).

Admittedly, this is also a stock photo. But pretty close to being legit.


I took the original recipe from a pin that led here. Of course, I'm a rebel. I'm not one to follow directions to the letter. I make my own rules. And so, as I often do, I tweaked the recipe a little bit. Let me explain...

The original chef says:

"What you need:
  • a two-pound roast, any visible fat trimmed away (I used bottom round)
  • 1-2 pounds of small red potatoes, washed and halved, unpeeled
  • 4-5 carrots, washed and cut into 2” chunks
  • 1 white or vidalia onion, thickly sliced
  • two celery ribs, washed and cut into 2” chunks
  • 3-5 garlic cloves
  • 1/2 cup water
  • salt and pepper, to taste
  • a large-ish slow cooker
How to do it:
  1. In the bottom of the crock pot, place the carrots, potatoes, celery, and garlic. Season with salt and pepper.
  2. Season all sides of the meat with salt and pepper. Place the meat on top of the vegetables. Place the onion slices around the sides and on top of the meat. (My thinking here was to have the onion juices cook into the roast… yum.)
  3. Pour the water into the slow cooker. Put the lid on and turn the cooker on “low”. Cook for 8-10 hours, or until the meat and potatoes are cooked and very tender.
  4. Serve and enjoy!"
What I did differently (to make it EPIC...and cheaper): 
  • I used around 1 3/4-2 T garlic powder instead of the cloves so I didn't have to add another thing to my grocery list.
  • I used Russet potatoes instead of red. I actually like red better, but the Russets were on sale when I bought groceries and I used them for other recipes. Why buy 2 kinds of potatoes? What is this, Buckingham Palace?
  • I didn't trim the fat. This was more laziness than anything, but I'm convinced that it also adds to the flavor. You don't have to sit there and chew on it. You can cut it off when you've got the roast beef on your plate. It was good enough for me as a kid and it's good enough for me now! 
  • I cooked it differently. See, it was Sunday. And I was ready for a lazy day. I didn't get out of bed until after 11am/start cooking til after 12 and it said to cook the roast for 8 hours. So, I cooked it for about 2 1/2 hours on high and then switched to low. It was ready around 6:30pm. If you're not a slacker, you can just cook it normally, but I'm quite happy with the level of cooked-ness that it was.
  • I added probably around 1/4 cup soy sauce and probably 1 T red wine vinegar for a little extra flavor. Don't get up in arms! I used low sodium soy sauce. Still not excellent for you, but much better than its alternative.
I love that this recipe used celery. That's not too common in roasts and I appreciated the extra green boost. Celery is one of the only foods that actually burns calories when you eat it because of the difficulty in digestion. It's excellent for you! I hate raw celery. But I'm trying to teach myself to like it. Cooked vegetables are good, but raw vegetables are better.

In any case, Tom (my fella, in case I haven't introduced him yet) was wowed. The roast beef was very tender, flavorful, juicy, and ever-so-slightly pink on the inside. Perfect. I will definitely use this method again! However, I will slow down next time. I sliced up my left thumb and forefinger pretty hardcore. Given, I was making like four freeze-ahead meals that day and just wanted to be done. Just be careful out there!

It's funny. I come across as a bit of a ball-buster; a "boss," if you will. Acquaintances might get the notion that I would be like this: 

Maybe sometimes, if I think you're a tool.
But since Tom and I have been dating, it's been more like this:

Haylee Turner: Pissing feminists off since 1990.
Just because you enjoy cooking/cleaning/house decor doesn't mean you can't also kick ass. You don't have to be one or the other, mo-fos! My daddy was a Marine, a sheriff's deputy, and a stellar athlete in his younger days. And you know what? He's one of the best chefs I know. BOOM.


Monday, January 14, 2013

Two Recipes and an Anecdote


First, the anecdote. Is it really an anecdote? I don't know. You decide. So, my baby sister Emily is getting married. She's 20. I think the whole thing is preposterous! I don't want to be married before 27. That just seems like the perfect age. Nevertheless, I am so happy that she has found a good fella. He's in the Air Force...and he's a ginger. haha. We very well may end up having the wedding by May, which is crazy; they only got engaged this past weekend! We are also poor kids. So, this is gonna take some real magic. Luckily, I've always dreamed of being a wedding planner. I've been perusing all the budget wedding sites. One of the first tips they give is to sign up for tons of giveaways and sweepstakes...so this morning, I set to signing Em up for everything I could find! I started making the wedding website (of course with colors befitting an Airman and his lady). I've been looking all day at DIY ideas from cakes to centerpieces...and I must say, I do believe we are going to be able to throw an amazing wedding. Rest assured there will be dancin', drinkin', and all the Southern charm we can muster--if I have anything to say about it. Who knows? Maybe I'll make a career out of this fun stuff! If (or when) we pull off these miracles, I'll share my secrets. It is insane how much people pay for weddings. And how expensive venues are! Fo'getta 'bout it! In other news...

Random Tip: Putting honey on your face for 15 minutes moisturizes and clears your pores! It's sticky...but worth it. ;)

So tonight I was in the mood for cookies. Completely unrelated to my dinner plan is this awesome recipe I found a while back on Pinterest. I added some of my own stuff, like I always do. The regular recipe as well as some variations of it (which look delicious but I haven't tried) can be found at this lady's blog. Actually, yeah, just check out her blog! They are Banana Oatmeal Cookies. They're delectable and super healthy. No milk, no eggs, no flour. I substituted Craisins for the raisins and semi-sweet chocolate chips for the nuts. I also added 2 T natural peanut butter and 2 tsp. honey. So freakin' delicious! And full of protein and fiber. I'm going to have them for breakfast. :)

The next recipe on the list is Crockpot Mac and Cheese with Broccoli (via AllRecipes.com). I decided to be a fatty and add more cheese as well as the leftover Canadian Bacon from Eggs Benedict night to make it a more filling/complete meal. Protein is important!

Mmm. Nothing looks yummier than a stock photo.


The Ingredients

-Cooking Spray
-4 cups Cheddar Cheese (or 6 if you're me. haha)
-2-12 oz. cans evaporated milk
-3 cups nonfat milk
-Vegetable Oil
-16 oz. uncooked elbow macaroni (I did the kind of noodles you use for stuffed shells instead, because they're just way better)
-1-14 oz. bag chopped frozen broccoli
-Salt and Black Ground Pepper to taste
-Uncooked Canadian Bacon, torn into small pieces (optional)

Directions

  1. Spray the inside of slow cooker with cooking spray.
  2. Stir uncooked macaroni and vegetable oil together in the slow cooker until pasta is coated.
  3. Stir Cheddar cheese, evaporated milk, milk, broccoli, Canadian Bacon, salt, and black pepper with macaroni until fully combined. 
  4. Cover the cooker and cook on Low until macaroni is tender and the sauce is bubbling, 2 1/2 to 3 hours, stirring often to reduce sticking.


Sunday, January 13, 2013

The Grocery Guru: Get Your Crap Together!

This entry is all about grocery-shopping. From ideas on how to save money to the 2-week dinner plan that inspired my last fantastic grocery trip, I've got some good things to share. If you'd rather eat fast food or go to the grocery store every other day buying meal-to-meal, suit yourself. This is for the smart kids out there. Or, in my experience, for the women. Because most men don't care or realize how much money they spend on food. haha. First up, the general stuff. Then I'll post a section including the meal plan and accompanying grocery list as well as the first night's recipes!

General Rules for Saving Money while Grocery Shopping

1) Stick to your list. I wasted so much money going into the store without a plan. I'd head in to grab one thing and come out with ten. Sticking to the list means that you should plan for snack foods and contingency meals in addition to the main event foods. Contingency meals are things like cans of soup or boxed mac and cheese. You never know when a meal will go wrong or if something will prevent you from cooking.

2) Check the price per unit (printed on the shelf-tag that gives you the price). Imagine choosing between two bags of chips equal in quality. One bag is $2 and one is $3. You're probably going to gravitate toward the "cheaper" one automatically, but check the unit price first. You might notice that the $2 bag is 12 ounces while the $3 bag is 24 ounces. You could get twice the product for only a dollar more and save money in the long run. My mom taught me that. It might seem like common sense, but you would be surprised how many people don't realize that the product with the better unit price is truly the cheaper product.

3) Know the deals. One thing I like to do is check out my grocery store's weekly ad. That way, I know what's on sale. For example, this last trip, I had apples on my list. Well, I normally like Red Delicious, but they had Jazz apples on sale for much cheaper. So, I got the apples that were on sale. Still yummy, still healthy. If you don't get the newspaper, it would be a good idea to look at your store's website.

I shop at Kroger. I went to their website and set up an account. I use my Kroger card all the time. You get all sorts of discounts, including an automatic 3 cents off of every gallon of gas when you fuel up there or at Shell stations (trust me, it adds up). Well, on the website, they have a section for digital coupons. You can load them directly on your card instead of having to find printable ones (although you may want to do that, too). I also discovered that if I transferred and filled a prescription, I would get $25 off of my groceries. I have a monthly prescription that just so happened to be up for a refill. It ended up being free through my insurance, so I didn't even have to spend money to get that $25 reward loaded onto my Kroger card! AND I got double fuel points (you always do when you fill a prescription there). So not only did I find all the applicable in-store discounts and get $25 off, I also ended up saving 20 cents per gallon the next time I filled up my gas tank.

4) Look for coupons...SELECTIVELY. Now, a lot of people use coupons the way the manufacturer's want you to--exactly the wrong way. Don't go out and buy something that isn't on your list or that you normally wouldn't use just because you found a 50 cent discount. A good resource for deals, coupons, and obsessive bargaining is The Krazy Coupon Lady. I am not going to spend time hulking out over a copiously filled coupon binder and piss everyone off in the grocery line, but I do enjoy using some of the coupons they post and plan to use more in the future. If you want to get into extreme couponing, more power to you. Maybe one day if I'm a housewife.

Precisely.

5) Don't be afraid of off-brands...well, only be afraid sometimes. In some cases, the generic product is the exact same thing as the name brand, just with a different label and price tag. Don't automatically grab generic brands, though. Sometimes, store brand items are more expensive. I don't know why. Maybe for those people who are inattentive and just grab what looks cheapest. DON'T BE ONE OF THOSE! Just don't be a sucker, mmkay? Be an educated and attentive shopper.

Other times, the ingredients are way different (and probably taste like crap). Sometimes the best brand is the best for a reason other than good advertising. For example, my fella loves Cheez-Itz. I wanted to buy some, but they were $3.77/box. The generic brand was half of that price. I almost went for it--but then I read the ingredients. The name brand used pretty much all-natural ingredients. It was a short list. The store brand ingredients filled up almost the whole side of the box. More chemicals, more ingredients=less healthy (and yes, I know Cheez-Itz aren't really healthy to begin with). I skipped the item altogether. Tom also likes Ritz. In this case, the off-branded crackers had identical ingredients, so I went ahead and bought them (even though Tom is a sucker for branding and complained a little, haha).

...That's all for now. Now to the dinner plan. I planned on only cooking every other day because we will have leftovers. I also made sure that several of the meals were able to be made ahead and frozen (crockpot!!) so that I won't have to fall off the wagon due to coming home late from work or what-have-you. Here we go:

1) Eggs Benedict, Asparagus, Pan-Fried Potatoes
2) Crockpot Mac and Cheese with Broccoli and Canadian Bacon
3) Pot Roast & Veggies
4) Chicken Parmesan Meatloaf & Asparagus
5) Crockpot Chicken Vegetable Soup & Cheese Toast
6) BBQ Roasted Salmon, Parmesan Broccoli, & Baked Potatoes
7) Poor Man's Prime Rib, Green Beans, & Mashed Potatoes
8) Crockpot Spaghetti & Meatballs with Garlic Toast

Next up, the grocery list:

Meats

Canadian Bacon, 2 lb. Pot Roast, 1 lb. Ground Chicken, 2 Boneless/Skinless Chicken Breasts (I substituted thighs because they were cheaper and would still work with the recipe), 4--6 oz. Salmon Filets, Eye of Round Roast, 16 oz. frozen (fully cooked) meatballs

Dairy

Parmesan Cheese, Shredded Italian Cheese, Shredded Cheddar (32 oz.), some sort of Sliced/Block Cheese*, Cream Cheese*, Milk

Veggies

Potatoes (5 lb. Russets were on sale, so I got those!), 6 carrots, Asparagus, Large Bag Frozen Chopped Broccoli, 3 Onions, Celery, Diced Tomatoes (canned)

Fruit

Apples, Bananas, 2 Lemons

Various Items

2 Cans Pasta Sauce, Pineapple Juice (I substituted a can of sliced pineapple in the juice--not in heavy syrup--because I can use the juice and have the slices as a garnish without buying a large bottle of juice I'll never use), English Muffins (I got 2 bags, one to use for the E.B. and one to use for snacks/lunches), Eggs, Thyme (I didn't have it), 24-oz. Evaporated Milk, 16-oz. Noodles for Macaroni (I went fancy on these and got a more expensive brand so I could get the ones you use for stuffed shells--personal preference, not required), 56-oz. Chicken Broth, Butter, Gallon Ziploc Bags, Boxed Mac and Cheese*, Ritz* (off-brand), Turkey Pepperonis*, Peanut Butter*, Jelly*, Oats*, 1 Packet Instant Hollandaise Sauce

*For various uses unrelated to the recipes. Obviously, you'll have different snacks or other things that you want for lunch or breakfast.

Keep in mind, if you don't have basic things like Olive Oil or Milk in stock, always check the recipes. I only made a list for things that weren't basic/I didn't have in my pantry or on my spice rack.

Lastly, the first night's basic recipes. I didn't do measurements because it's all just according to how much you want to make. Here they are:


Eggs Benedict: Ingredients--Canadian Bacon, Eggs, English Muffins, Hollandaise Sauce Packet (feel free to do fresh, I just wanted to make it quick!), Parsley (I used dried because it's cheaper and it's just a garnish anyway)

Fry Canadian Bacon until brown. Set aside.
Poach eggs. I used this easy Microwave Method!
Make sauce according to directions on packet.
Layer from the bottom thus: English muffin, canadian bacon, egg, Hollandaise sauce, parsley for garnish.

BOOM.

Yummers.

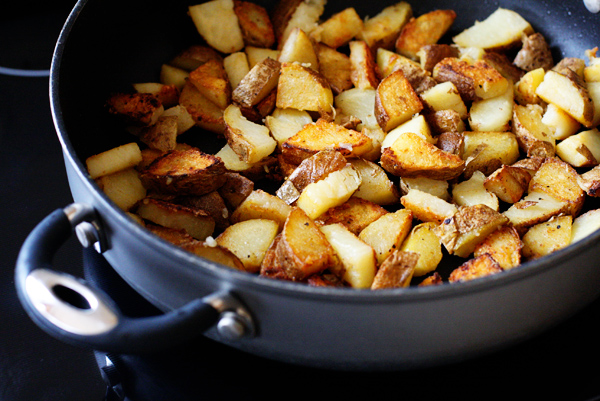
Fried Potatoes: Ingredients--Potatoes [(duh) I used 2 large Russets], Olive Oil, Salt&Pepper, Onion Powder or Onion, Water

Slice potatoes into many small chunks. Fry in the olive oil until brown and at desired texture. Periodically add 1/3 cup water (a few times, as it will start to cook out) to soften the potatoes. While cooking, salt&pepper to taste. If using onion powder, season to taste. If using onion, make sure it's chopped up and cooked in with the potatoes. I used onion powder because it's cheap and I already had it.

Ah yeah.

Sauteed Asparagus: Cook on medium in olive oil. Salt&pepper to taste. Typically I cook with white wine and parmesan as well, but this time I stuck with a basic recipe. It's delicious either way. Cook until bright green. Drizzle with the excess Hollandaise sauce.

That's it! A delicious, easy dinner that looked FANCY AS HELL. Cook the meat, potatoes, and asparagus all in the same pan without washing inbetween. Gives it excellent flavor.

Heretofore, I'll be posting actual detailed recipes from their sources. If you're double-checking for ingredients, visit my Pinterest food board. Every recipe I used is listed there by name with the links. This time, I just did my own thing. But the rest of the meal plan is based on legit sources. Anywho, tune in next time for other tips and a new recipe. In the meantime...